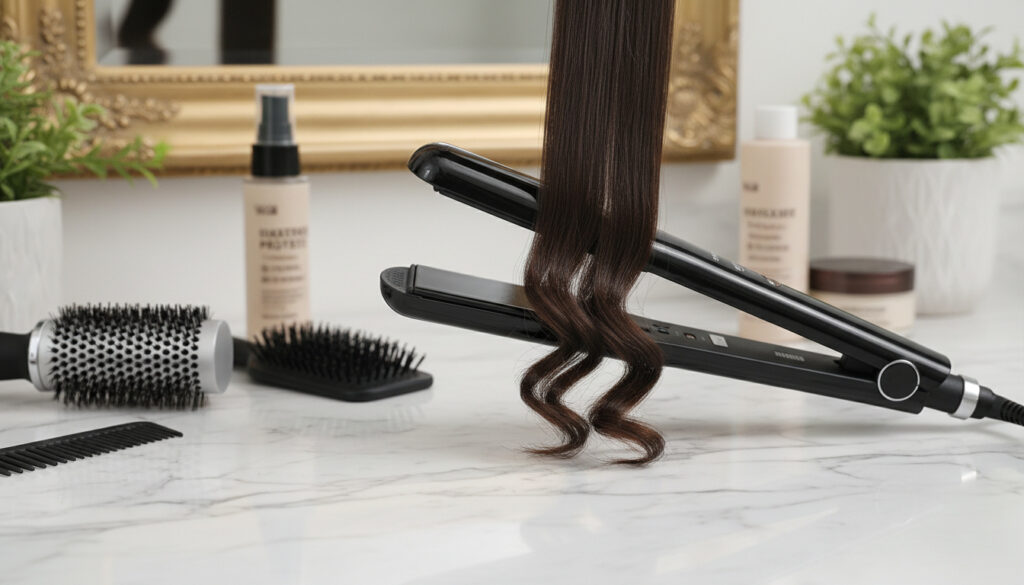
How to Curl Hair with Straightener – Step-by-Step Guide
Transforming a flat iron from a straightening tool into a curling device opens versatile styling possibilities, creating everything from relaxed beach waves to defined spirals without investing in additional hot tools. The technique relies on controlled rotation and gliding motions that manipulate hair around the heated plates, essentially wrapping strands against the iron’s surface to set a curved shape.
Mastering this method requires understanding heat mechanics, sectioning geometry, and directional rotation principles. Unlike cylindrical curling irons that wrap hair around a barrel, straighteners clamp hair between two plates, demanding precise wrist rotation to create tension and shape simultaneously.
This guide breaks down the complete process from preparation through finishing, covering temperature protocols for different hair textures, specific techniques for varied curl types, and evidence-based strategies for extending style longevity while minimizing thermal damage.
How Do I Curl My Hair with a Straightener? Step-by-Step Guide
The fundamental motion involves clamping hair at the root, rotating the iron 360 degrees, then gliding downward while maintaining tension. Execution varies based on desired curl intensity and hair length, requiring adjustments to section size and iron angle.
Key Insights
- Clamp rotation direction determines whether curls face toward or away from the face
- Section size inversely correlates with curl tightness—smaller sections create pronounced spirals
- Blow-drying hair completely smooth before curling significantly eases the gliding process
- Alternating curl directions between sections prevents pattern clashing and creates dimensional texture
- Cool-down time before brushing affects how long the set lasts throughout the day
- Holding the iron at a 45-degree angle during gliding optimizes tension for defined curls
| Hair Texture | Temperature Range | Section Width | Iron Angle | Expected Duration |
|---|---|---|---|---|
| Fine/Thin | 320-350°F (160-175°C) | 1-inch | Vertical | 4-6 hours |
| Medium/Normal | 350-380°F (175-195°C) | 1.5-inch | 45-degree | 6-8 hours |
| Thick/Coarse | 380-410°F (195-210°C) | 2-inch | Horizontal | 8-12 hours |
| Short (bob length) | 350°F (175°C) | 0.5-inch | Vertical | 3-5 hours |
| Long (past shoulders) | 370°F (185°C) | 2-inch | Horizontal | 6-10 hours |
| Chemically Treated | 300-340°F (150-170°C) | 1-inch | Vertical | 2-4 hours |
What Temperature and Prep Do I Need for Straightener Curls?
Proper preparation determines both the immediate result and long-term hair health. The process begins on damp hair with volumizing products, extends through blow-drying technique, and concludes with thermal protection immediately before iron contact.
Temperature Guidelines by Hair Type
Research on thermal styling indicates that thick, coarse hair with natural curl patterns requires the highest setting at approximately 210°C (410°F) to effectively reshape the hair structure. Conversely, fine or flat hair (Type 1 classification) should not exceed 185°C (365°F) to prevent cuticle degradation.
Intelligent heat control technology becomes crucial here—systems that regulate temperature multiple times per second prevent the plates from exceeding the selected threshold, maintaining consistent thermal exposure throughout the styling pass.
Product Preparation Sequence
Video demonstrations of the technique emphasize applying volumizing spray or mousse to damp or towel-dried hair before blow-drying. This foundational layer helps lock in the curl pattern and prevents the style from dropping prematurely.
Blow-drying should continue until hair reaches a smooth, sleek state without residual moisture. Any dampness creates steam when clamped between hot plates, leading to bubbled cuticles and uneven texture. Following drying, a dedicated heat protectant creates a barrier between the hair strand and thermal tools.
Intelligent heat control that regulates temperature multiple times per second helps prevent exceeding your selected temperature, reducing damage risk during the gliding motion.
How to Get Beach Waves or Other Styles with a Straightener?
Changing the rotation pattern and iron orientation produces distinctly different aesthetic results, from casual beach texture to formal spirals. Each variation requires specific wrist movements and steady gliding speeds.
Relaxed Beach Waves
For the turn-in-turn-out method associated with beach waves, gather hair at the top near the root, rotate the iron inward toward the head, pull downward several inches, then rotate outward away from the head before completing the pass. This alternating motion creates the irregular, S-shaped pattern characteristic of natural wave formations.
Tight, Bouncy Curls
Technical demonstrations show that holding the straightener more horizontally while gliding outward creates a tighter, rounded curl shape. This positioning maximizes the hair’s contact time with the heated surface and increases the wrap degree around the plates.
Loose, Elongated Curls
Holding the straightener vertically and gliding straight down without angling outward produces the loosest, most elongated wave shape. This technique works particularly well for creating soft movement in long layers without tight spiraling at the ends.
How Long Do Straightener Curls Last and How to Make Them Stay?
Longevity depends on preparation quality, environmental humidity, and post-styling care. While individual results vary based on hair porosity, specific techniques extend wear time significantly.
Extending Style Duration
Investment in proper prep work yields the greatest returns for curl retention. Data on styling longevity confirms that volumizing products applied before blow-drying create texture that helps curls anchor to the hair structure. Following the heat styling process, locking the shape with hairspray while the hair remains warm sets the hydrogen bonds in their new configuration.
Directional Alternation for Natural Texture
Styling tutorials recommend rotating the straightener toward your face for sections between the front hairline and ear, then in the opposite direction for back sections. This alternation prevents curls from clashing against each other and creates varied, dimensional waves that resist tangling and premature straightening.
While preparation techniques can extend wear time, actual duration depends heavily on individual hair porosity and environmental humidity levels, making exact time predictions variable.
Finer hair types exhibit higher vulnerability to heat damage. Exceeding 185°C risks permanent cuticle degradation and moisture loss that compromises long-term hair health.
For finishing, demonstrations of final styling recommend brushing through the curls starting from the bottom and working upward using a wide-tooth comb. This creates a softer, more blended wave rather than defined ringlets, while distributing natural oils and product evenly.
The Complete Styling Sequence
Executing the technique follows a chronological progression from wet preparation through final setting. Each stage builds on the previous to create lasting shape.
- Preparation: Apply volumizing spray or mousse to damp hair, then blow-dry until completely smooth and sleek
- Sectioning: Use index fingers to draw a line from the top of the ear to the back of the head, then twist and clip that section away to create manageable working zones
- Protection: Apply appropriate heat protectant products before any heat styling tool contact
- Temperature Setting: Select 210°C for thick/coarse hair or 185°C and below for fine hair based on thermal tolerance
- Root Clamping and Rotation: Clamp at the root, perform a full 360-degree rotation, then glide downward at a 45-degree angle while maintaining tension
- Direction Alternation: Rotate toward the face for front sections, away from the face for back sections to create natural texture variation
- Finishing: Brush through with a wide-tooth comb from bottom to top, then apply hairspray to lock the style
Established Facts vs. Variable Factors
Research provides clear guidance on certain safety protocols while acknowledging individual variation in cosmetic outcomes. Understanding this distinction helps set realistic expectations.
| Established Information | Information Remaining Unclear |
|---|---|
| Heat protectant is mandatory for damage prevention before any thermal styling | Precise hold time varies significantly by individual hair porosity and environmental humidity |
| Smaller sections produce tighter curls; larger sections create looser waves | Universal optimal temperature exists within ranges, but exact thresholds vary by individual hair condition |
| Blow-drying preparation enables significantly easier curling and better results | Specific product formulations show variable efficacy across different hair types in independent testing |
| Intelligent heat control prevents temperature spikes that exceed selected settings | Long-term effects of repeated thermal styling at borderline temperatures require further longitudinal study |
Technical Context and Evolution
The technique emerged from professional salon practices where stylists sought dual-purpose tools for travel efficiency and budget-conscious clients. By manipulating the flat iron’s plate orientation—originally designed solely for compression-based straightening—practitioners discovered that rotational gliding creates helical wrapping similar to traditional curling methods.
Physics explains this transformation through heat transfer mechanics. When hair clamps between two plates and rotates, the strand wraps around one plate’s edge while the opposite plate provides counter-tension. This creates a thermal set along the hair’s length rather than just at the point of contact, effectively reproducing the barrel-wrapping action of conventional curling irons but with adjustable tension controlled by the user’s grip pressure.
Modern iterations incorporate floating plates and intelligent heat control systems that regulate temperature multiple times per second, reducing the damage risk associated with early flat-iron curling methods that lacked precise thermoregulation. Dark Circles Under Eyes – Causes, Treatments & Prevention
Expert Perspectives and Source Attribution
Professional guidance emphasizes the relationship between tool movement and final texture. Controlled clinical observations indicate that wrist rotation speed and glide angle significantly influence curl longevity.
Twist and glide for natural waves
Expert Stylist
Additional technical specifications regarding heat damage prevention derive from dermatological guidelines on thermal hair styling. Dermatological recommendations support the use of heat protectant formulations and temperature limitation strategies to maintain cuticle integrity.
Regulatory considerations from FDA cosmetic product guidelines and biomedical research on hair fiber structure inform the temperature thresholds and damage prevention strategies outlined herein.
Key Takeaways
Mastering straightener curls requires coordinating preparation, temperature selection, and rotational technique. Success depends on starting with completely dry, product-protected hair, selecting appropriate heat settings for your specific texture, and maintaining consistent tension while alternating curl directions for natural movement. Hoar Cross Hall Spa – Guide to Facilities, Prices and Reviews
Frequently Asked Questions
Can you curl short hair with a straightener?
Yes, though it requires narrower sections and precise clamping near the roots. Use 0.5-inch sections and hold the iron vertically for best control on shorter lengths.
Tips for curling thick or fine hair with flat iron?
Thick hair needs smaller sections and 380-410°F temperatures for effective hold. Fine hair requires larger sections and temperatures below 350°F to prevent cuticle damage and breakage.
Best straighteners for curling hair?
Models featuring intelligent heat control and 1-inch floating plates perform best. The research does not endorse specific brands but emphasizes these functional characteristics.
What is the difference between curling with a straightener vs curling iron?
Straighteners create flatter, more varied wave patterns through twisting motions and plate clamping, while curling irons produce uniform cylindrical curls through barrel wrapping.
Do I need heat protectant for straightener curls?
Yes. Research confirms heat protectant products are essential before styling to minimize cuticle damage and moisture loss from thermal exposure.
More related posts
 CW Sellors Administration Collapse – Timeline, Impacts and Rescue
 NS&I Prize Checker – How to Check Prizes Online and App
 Aldi Easter Opening Times – UK Hours Good Friday To Easter Monday 2026
 Cast of The Pitt – Meet the ER Doctors and Nurses
 Denise Gough Movies and TV Shows: Full Credits List
 Angry Ginge Net Worth – Earnings Facts and Career Overview
 How to Legally Avoid Paying the TV Licence in Ireland
 Houses for Sale in East Kilbride: 69 Three-Bed Listings